Plane Placement
The Plane Placement Mode lets you add scenes on a plane. Combined with the snapping is useful for working with modular scenes.
To place a scene select its thumbnail in the scene palette and click on the scene to place it: if snapping is enabled you can paint scenes by dragging, otherwise dragging will let you adjust the y rotation of the placed scene.
Press Esc to stop placing scenes.
Press A, S, D to rotate the scene on the X, Y, Z axis by 90 degrees respectively, hold Shift to rotate by 45 degrees or by an amount you can specify in the Settings and Configuration.
Press 1, 2, 3 to flip the scene on the X, Y, Z axis respectively.
To reset the current scene transform you can press Shift+E or press the reset button on the scene thumbnail in the scene palette.
Pressing Space when no scene is selected will select the last selected scene in the scene palette.
To place and select a scene hold Alt when clicking.
If snapping is enabled you can temporarely disable it by pressing Ctrl.
This mode is based on the concept of a local grid that can have an arbitrary offset and rotation around the y axis:
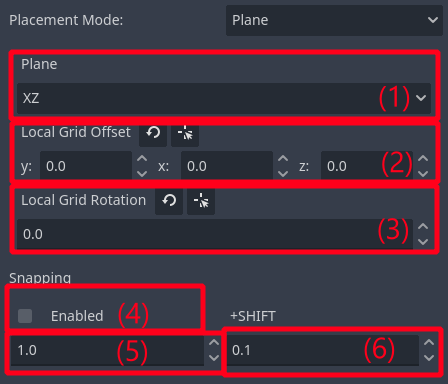
Select which plane on the local grid to place scenes to (XZ is the default normal to the y axis, YZ is normal to the x axis and XY to the z axis).
- Set the local grid offset, you can set it manually or select an already placed node in the scene and match its offset.
You can adjust visually the offset along the normal of the current plane by pressing G, then click to confirm or Esc to cancel.
Set the local grid rotation, you can set it manually or select an already placed node in the scene and match its rotation on the y axis.
Enable/Disable grid snapping.
Set the snap size of the grid.
Set the snap size of the grid when Shift is pressed.